Exploring the HTML5 Web Audio API: Filters
03-07-2015 Update: Updated the example, it now works with the latest versions of Chrome and Firefox
With the Web Audio API you can have advanced audio processing directly inside your browser. This API specifies a whole bunch of nodes you can use to create your audio processing pipeline. In a previous article I showed a number of these components, and how they can be used together to play back sound and visualize the results. In this second article in the series on the Web Audio API we’re going to look a bit closer at the following subjects:
- Filter node: How do you use the various filter nodes that are available.
- Oscillator node: Use a tone generator as audio input.
- Microphone input: Record and visualize the input from the microphone.
For those who want to directly dive into the filters, I’ve created a web application that allows you to experiment with Web Audio filters (click the image):.
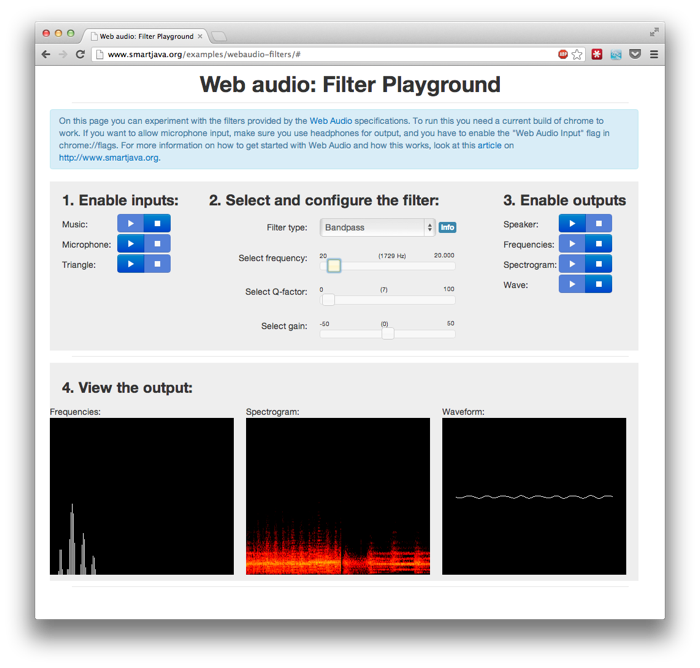
The controls of this application shouldn’t be too hard. At the top you’ve got three settings:
- Select the inputs that should play: Music will loop a 30 second piece of classical music, Microphone will use the microphone as input and Triangle creates a "triangle"wave (very noisy). More than one can be selected, they will be automatically mixed.
- Configure the filter to use: By changing the dropdown and using the sliders you can configure the filters. When you hover over "info" you're shown information on what slider does what.
- Select what output to use: You can enable each of the outputs separately. The visual ones are shown at the bottom. When enabling "speaker" watch out when using "Triangle" input.
Whenever you change something, this change is immediately reflected in the audio configuration. So by sliding the controls of the filter you can immediately see (and hear) what happens.
Using filter nodes
We won’t dive too deep into the various nodes in this article. If you want to know the details of the “Web Audio API” look at the previous article I wrote on this subject. With a filter node you can, as the name implies, filter certain parts of your audio stream. You can for instance filter out all the lower frequencies, or make the bass more pronounced. This API offers the following set of filters:
- LOWPASS: A lowpass filter allows frequencies below the cutoff frequency to pass through and attenuates frequencies above the cutoff. LOWPASS implements a standard second-order resonant lowpass filter with 12dB/octave rolloff.
- HIGHPASS: A highpass filter is the opposite of a lowpass filter. Frequencies above the cutoff frequency are passed through, but frequencies below the cutoff are attenuated. HIGHPASS implements a standard second-order resonant highpass filter with 12dB/octave rolloff.
- BANDPASS: A bandpass filter allows a range of frequencies to pass through and attenuates the frequencies below and above this frequency range. BANDPASS implements a second-order bandpass filter.
- LOWSHELF: The lowshelf filter allows all frequencies through, but adds a boost (or attenuation) to the lower frequencies. LOWSHELF implements a second-order lowshelf filter.
- HIGHSHELF: The highshelf filter is the opposite of the lowshelf filter and allows all frequencies through, but adds a boost to the higher frequencies. HIGHSHELF implements a second-order highshelf filter
- PEAKING: The peaking filter allows all frequencies through, but adds a boost (or attenuation) to a range of frequencies.
- NOTCH: The notch filter (also known as a band-stop or band-rejection filter) is the opposite of a bandpass filter. It allows all frequencies through, except for a set of frequencies.
- ALLPASS: An allpass filter allows all frequencies through, but changes the phase relationship between the various frequencies. ALLPASS implements a second-order allpass filter
You create a filter like this:
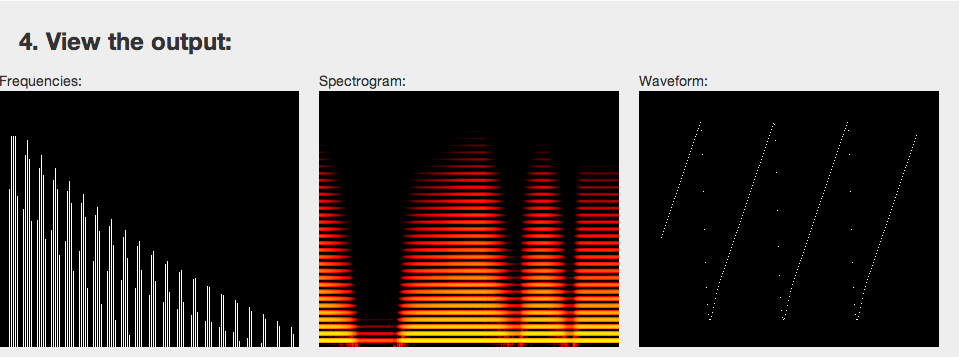
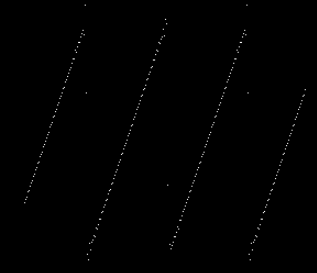
And just like all the other nodes, you use “connect” to add this to the audio processing pipeline. And basically that’s all there is to using filters. The following screenshot show the output of the spectrometer when using a LOWPASS filter. In this example I’ve used a “Triangle” source. A Triangle is build up of a number of frequencies, so nicely allows us to see what happens when we start playing around with filters. To get this effect I’ve moved the frequency slider up and down, and as you can see, certain highter frequencies are blocked by the filter.
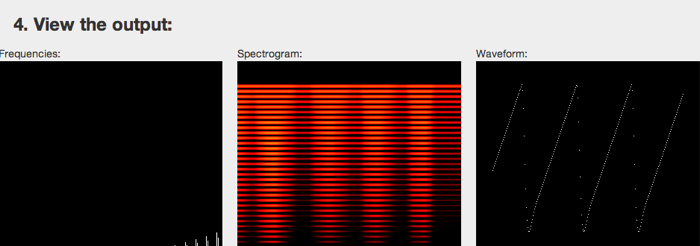
If we look at the HIGHPASS filter we see exactly the opposite when sliding the frequency up and down.
Interesting stuff, right! If you want to know more about the filters look at the BiquadFilterNode section in the W3 API, or experiment with the filter playground I created.
Oscillator node
In the previous section we used a triangle as our waveform. We can create this waveform (and some others) directly from the Web Audio API.
Here frequency is the frequency of the wave the oscillator should produce, and type defines the waveform.
const unsigned short SINE = 0;
const unsigned short SQUARE = 1;
const unsigned short SAWTOOTH = 2;
const unsigned short TRIANGLE = 3;
const unsigned short CUSTOM = 4;
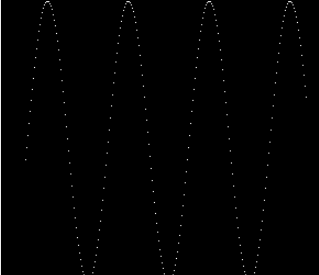
This results in the following wave forms:
Sine:
Square:

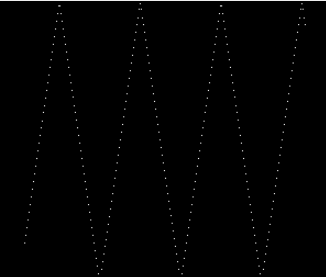
Sawtooth:
Triangle:
The final one, which I didn’t show, is the custom one. Here you can supply a Wavetable, which is a set of sine terms and cosine terms that together make up the waveform.
So, enough for the oscillator node. Final item on the list is how to use your microphone as input.
Microphone input
In a previous article on capturing audio in the browser, I already showed you how you can access the microphone. To use it in the Web Audio API we only need to take a couple of steps more. Before we look at how to do this, first we have to make sure chrome can access your microphone. Go to “chrome://flags” and make sure the following is enabled:
![]()
To use the microphone as input all we need to do now is the following:
We use the getUserMedia call (prefixed for chrome) to ask access to the microphone. Once we get it, we connect this source, just like we would any other source.
That’s it for this part on the Web Audio API. So start playing around with the filter playground and let me know if you’ve got any questions.