Three.js tutorial: example with webgl, canvas and webworkers
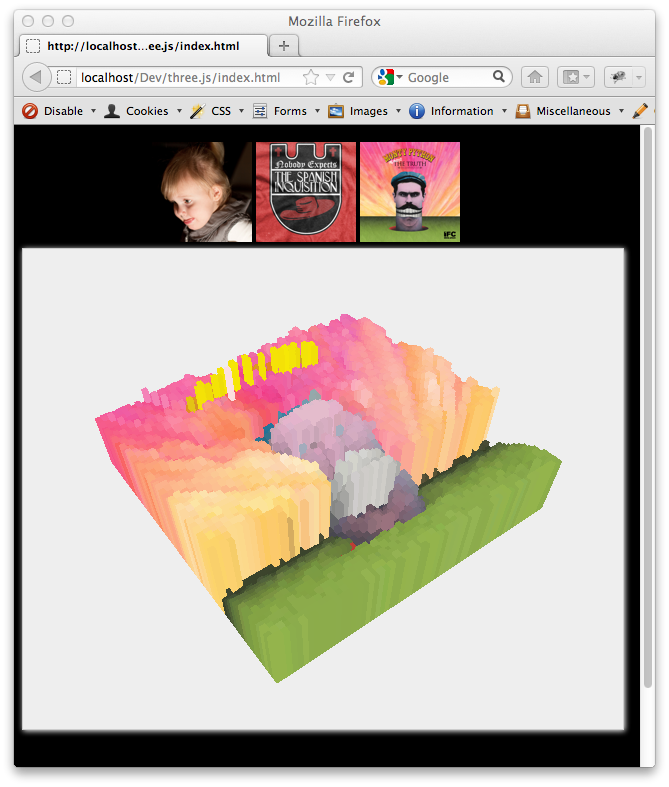
In this tutorial we’ll look at how you can use three.js to render a 3D map of an image using webgl on a canvas element. In this example we’ll rasterize an image (make it like an old 8-bit image), and use this rasterized image as input for our 3D model. Each raster element is rendered as a cube using three.js. The height of the cube is defined by the brightness of the raster element. Since an image usually better explains what we’re aiming for, lets look at what we’re going to create:
This article uses a couple of examples from previous articles:
- It uses the web worker threadpool shown in this article.
- And it rasterizes the image based on info from here.
- And brightness is calculated as explained here.
You don’t really need to dive into those articles to learn about three.js, but if you like some background information, those articles are the places to look at. Now, what are we going to show in this article.
- Create HTML layout: We'll create a very simple gallery, where you can select the image you want to render. We also need to setup a hidden canvas, we can use for rasterizing.
- Initialize the three.js scene: We create a simple three.js scene, with a rotating camera. To this scene we'll add a couple of hundred cubes. One for each part of our rasterized image.
- Add the cubes to the scene: When an image is selected we, rasterize the image (in a number of background web worker threads) and based on the brightness add a cube at a specific position to the three.js scene.
Create HTML layout
The HTML is very simple. We just got a couple of divs, include some javascript libraries and style some of the elements. The complete html is shown here:
<!DOCTYPE HTML PUBLIC "-//W3C//DTD HTML 4.01 Transitional//EN"
        "http://www.w3.org/TR/html4/loose.dtd">
<html>
<head>
    <title></title>
    <script type="text/javascript" src="libs/jquery-1.7.2.js"></script>
    <script type="text/javascript" src="libs/three.js"></script>
    <script type="text/javascript" src="libs/thread-pool.js"></script>
    <script type="text/javascript" src="js/rasterize.js"></script>
    <script type="text/javascript" src="js/voxel-image.js"></script>

    <style type="text/css">
        .thumb {
            /*float: left;*/
            margin-top: 10px;
            height: 100px;
            width: 100px;
        }

        #webglcontainer {
            width: 600px;
            height: 480px;
            border: solid 1px #CCC;
            -moz-box-shadow: 1px 1px 5px #ffffff;
            -webkit-box-shadow: 1px 1px 5px #ffffff;
            box-shadow: 1px 1px 5px #ffffff;
            background-color: #eeeeee;
        }

        body {
            background-color: #000000;
        }
    </style>
</head>
<body>

<div id="target" style="display: inline; visibility: hidden; height:0px; width: 0px;"></div>

<div style="margin-left: 130px">
<img id="f1" src="assets/sophie.jpg" class="thumb" border="0"/>
<img id="f2" src="assets/mp1.jpg" class="thumb" border="0"/>
<img id="f3" src="assets/mp2.jpg" class="thumb" border="0"/>
</div>

<div id="webglcontainer"></div>


<script type="text/javascript">

    $(document).ready(function () {
        $("#f3").load(function () {
            init();
            renderImage($(this));

            $(".thumb").click(function () {
                renderImage($(this));
            });
        });
    });
</script>
</body>

</html>
As you can see from this HTML, everything we do here is rather straightforward. We define a hidden div that we use for rasterizing, a div that contains a couple of images for our gallery and finally a div that is going to be used to render the result in. We also use a simple JQuery $(document) and $(“#f3”) to make sure the document is ready and the image is loaded before we start rendering. Once the first image is loaded, we pass that to renderImage function. This function will rasterize the image and show the output in the webglcontainer div.
Initialize the three.js scene
Before the image can be rendered we first need to correctly setup the scene for three.js. We do this in thie init method.
// some global variables
var camera, scene, renderer;
var elements = [];

// some default values
var bulletSize = 10;
var offset = 300;
var defPos = 800;

// Initialize the scene and threadpool
function init() {

    // create a queuepool with 6 queues
    queuepool = new Pool(3);
    queuepool.init();

    // create a scene and a camera
    scene = new THREE.Scene();

    //Three.PerspectiveCamera()
    camera = new THREE.PerspectiveCamera( 55, 1,  0.1, 10000, -2000, 10000 );
    // position the camera
    camera.position.y = defPos+200;
    camera.position.z = defPos;
    camera.position.x = defPos;

    // and add to the scene
    scene.add(camera);

    // setup the renderer and attach to canvas
    renderer = new THREE.WebGLRenderer();
    renderer.setSize( 600, 600 );

    $("#webglcontainer").append(renderer.domElement);

    animate();
}
In this method we first create a queuepool, this queuepool is used to run jobs. For this example we use jobs to calculate the most dominant color of a specific part of an image (more info can be found in this article). Next we create the scene, the camera and add the camera to the scene. Finally, in this code fragment, we create the renderer for this scene and append it to the canvas. Now that the scene is created we can render it. This is done in the animate function:
// the animation loop. This rotates the camera around the central point.
function animate() {
    var timer = Date.now() * 0.0008;
    camera.position.x = (Math.cos( timer ) * defPos);
    camera.position.z = (Math.sin( timer ) * defPos) ;
    camera.lookAt( scene.position );

    renderer.render( scene, camera );
    requestAnimationFrame( animate );
}
This animate function uses the requestAnimationFrame functionality to get a callback when the animation needs to be updated. We supply the animate method itself as it’s callback, so the animation will keep on running. In this animate function we also rotate the camera around the scene. For this we alter the X and the Z position of the camera, while keeping it focussed on our scene. Without going into the math behind this, if you alternate the X-pos using a Math.cos(t) and the Z-pos simultaniously using Math.sin(t) your camera will smoothly rotate around the scene. Now we can call the render operation on the renderer to render the scene.
Add the cubes to the scene
What is left is adding the cubes to the scene. We do this in the following function called addElement
// add a cube to the grid. The cube is positioned base on the x,y values. The color
// is used to define the material, and the luminance is used for the height of the element.
function addElement(x,y, color, lumin) {
    var voxelPosition2 = voxelPosition = new THREE.Vector3();
    voxelPosition2.x = bulletSize*x -offset ;
    voxelPosition2.z = bulletSize*y -offset ;
    voxelPosition2.y = 200 + ((lumin/(255))*200)/2;

    var geometry = new THREE.CubeGeometry( bulletSize, (lumin/(255))*200, bulletSize );
    var mat = new THREE.MeshBasicMaterial( { color: color, shading: THREE.NoShading, wireframe: false, transparent: false })

    var cube = new THREE.Mesh(geometry,mat);
    cube.position=voxelPosition2;

    // add to elements list and to scene
    elements.push(cube);
    scene.add(cube);
}
This function takes as parameters the position of the element, the color in which we need to render the element and the luminance of the element. Based on this information we determine the position where we need to render the cube, we create a cube whose height is based on the luminance, and make a material for this cube based on the most dominant color. With all these parts we can add the cube at the correct position to the scene. And since we already started the animate function, the scene will be updated continuously.
One thing missing we haven’t talked about is what the renderImage operation looks like that we call from the HTML page whenever you click on an image. This function is shown here:
function callback(event) {

    var wp = event.data;

    // get the colors
    var colors = wp.result;

    var color = "0x" +
        ("0" + parseInt(colors[0][0],10).toString(16)).slice(-2) +
        ("0" + parseInt(colors[0][1],10).toString(16)).slice(-2) +
        ("0" + parseInt(colors[0][2],10).toString(16)).slice(-2);


     var lumin = colors[0][0] * .3 + colors[0][1] * .59 + colors[0][2] * .11;

     addElement(wp.x,wp.y, color, lumin);
}
What we do here, is that we clear the queue and stop any running tasks (this isn’t perfect at the moment, so you might see some cubes from the previous image). Next we remove all the current cubes from the scene and finally we rasterize the selected image. In this rasterize function we split the image in parts. I won’t show the details for rasterizing here, but I’ll show the callback that is called after determining the dominant color (see here for more info on the rasterizing part).
The event we receive here contains information about what the dominant color of a specific part of the image is. We convert this color to the format used by three.js and calculate the luminance of this color. all this information is passed to the addElement function we saw earlier and it is added to the scene.
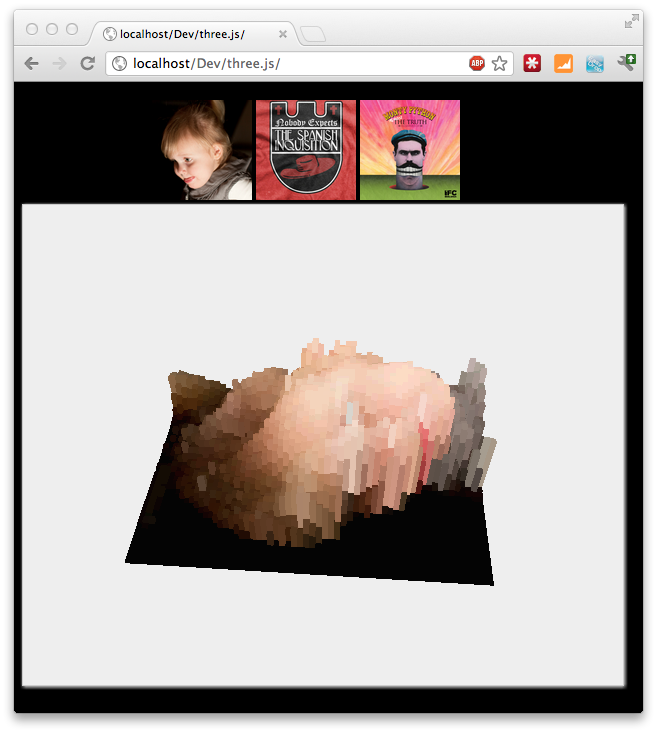
That’s it. If you run this, you’ll slowly see the scene being filled by colored cubes with different heights like this:
This example was tested using the latest chrome build and the latest firefox beta. I noticed that chrome, even though it was quicker, sometimes crashed, but both browsers should be able to render this.