Tutorial: Getting started with scala and scalatra - Part IV
Welcome to the last part of this series of tutorials on scala and scalatra. In this part we’ll look at how you can use Akka to handle your requests using an asynchronous dispatcher, how to use subcut for dependency injection and finally how you can run the complete API in the cloud. In this example I’ve used openshift from JBoss to run the API on JBoss Application Server 7.1. Now what have we seen in the previous tutorials:
- Tutorial I: Setup scala and scalatra for use within Eclipse and create your first application.
- Tutorial II: Start scalatra embedded, create a REST api that used JSON and test with specs2
- Tutorial III: Add persistency with scalaquery and add a hmac based security layer
The examples in this tutorial assume you’ve completed the previous three tutorials. We won’t show all the details, but focus on adding new functionality to the existing application (from part III). To be precise in this example we’ll show you the following steps:
- First, we'll introduce subcut to the application for dependency injection
- Next, we'll make our requests asynchronous by using Akka's futures
- Fiinally, we'll enable CORS, package the application and deploy it to openshift
And we’ll have an API we can call on the openshift cloud.
Let’s start with subcut
Adding dependency injection to the application
In java there are many dependency injection frameworks. Most people have heard of Spring and Guice and dependency injection even has its own JSR and specifications. In scala, however, this isn’t the case. There has been lots of talk whether scala application need a DI framework, since these concepts can also be applied using standard Scala language constructs. When you start investigating dependency injection for Scala you’ll quickly run into the cake pattern (see here for a very extensive explanation). I won’t go into the details why you should or should not use the cake pattern, but for me personally it felt like it introduced too much cruft and glue code and I wanted something simpler. For this article I’m going to use subcut. Subcut is a really small and simple to use framework, which makes using DI in scala very easy and unobtrusive.
Nothing works like examples. So what do you need to do have subcut manage your dependencies. First of, we of course need to nicely separate our implementation from our interface/trait. In part III we create a set of repositories which we used directly from the scalatra routes by creating them as class variables:
  // repo stores our items
  val itemRepo = new ItemRepository;
  val bidRepo = new BidRepository;
The problem is this binds our routes directly to the implementation, which is something we don’t want. So first lets expand the repositories by defining a trait for these repositories.
trait BidRepo {

  def get(bid: Long, user: String) : Option[Bid]
  def create(bid: Bid): Bid
  def delete(user:String, bid: Long) : Option[Bid]
}

trait ItemRepo {
  def get(id: Number) : Option[Item]
  def delete(id: Number) : Option[Item]
}

trait KeyRepo {
  def validateKey(key: String, app:String, server: String): Boolean
}
Nothing out of the ordinary. We use this trait from our implementations, like shown below, and we’re done.
class BidRepository extends RepositoryBase with BidRepo {
 ...
}
Now that we’ve defined our traits, we can start using subcut to manage our dependencies. For this we need a couple of things:
- Which implementation are bound to what trait
- Which classes need to have resources injected
- Bootstrap the 'root' object with our configuration
Before we start. We first need to update our build.sbt with the subcut dependency and add the correct repository.
libraryDependencies ++= Seq(
  "com.escalatesoft.subcut" %% "subcut" % "2.0-SNAPSHOT",
  "org.scalaquery" %% "scalaquery" % "0.10.0-M1",
  "postgresql" % "postgresql" % "9.1-901.jdbc4",
  "net.liftweb" %% "lift-json" % "2.4",
  "org.scalatra" % "scalatra" % "2.1.0",
  "org.scalatra" % "scalatra-scalate" % "2.1.0",
  "org.scalatra" % "scalatra-specs2" % "2.1.0",
  "org.scalatra" % "scalatra-akka" % "2.1.0",
  "ch.qos.logback" % "logback-classic" % "1.0.6" % "runtime",
  "org.eclipse.jetty" % "jetty-webapp" % "8.1.5.v20120716" % "container",
  "org.eclipse.jetty" % "test-jetty-servlet" % "8.1.5.v20120716" % "test",
  "org.eclipse.jetty.orbit" % "javax.servlet" % "3.0.0.v201112011016" % "container;provided;test" artifacts (Artifact("javax.servlet", "jar", "jar"))
)

resolvers ++= Seq("Scala-Tools Maven2 Snapshots Repository" at "https://oss.sonatype.org/content/groups/public/",
                  "Typesafe Repository" at "http://repo.typesafe.com/typesafe/releases/")
This not only adds the subcut dependencies, but also the akka onces we’ll see further in this article.
Bind implementations to a trait
Bindings in subcut are defined in a binding module. So by extending a module you create a configuration for your application. For instance you could define a configuration for test, one for QA and another one for production.
    // this defines which components are available for this module
    // for this example we won't have that much to inject. So lets
    // just inject the repositories.
    object ProjectConfiguration extends NewBindingModule(module => {
      import module._   // can now use bind directly

      // in our example we only need to bind to singletons, all bindings will
      // return the same instance.
      bind [BidRepo] toSingle new BidRepository
      bind [ItemRepo] toSingle new ItemRepository

      // with subcut however, we have many binding option as an example we bind the keyrepo and want a new
      // instance every time the binding is injected. We'll use the toProvider option for this
      bind [KeyRepo] toProvider {new KeyRepository}
    }
 )
Without diving too deep into subcut. What we do in this code fragment is that we bind an implementation to a trait. We do this for all the resources we want to inject, so subcut knows which implementation to create when it encounters a specific interface. If we want to inject different implementations of a specific trait we can also add an id to the binding, so we can uniquely reference them.
Configure classes that need to have resources injected
Now that we have a set of traits bound to an implementation we can let subcut inject the resources. For this we need to do two things. First we need to add an implicit val to the HelloScalatraServlet class.
class HelloScalatraServlet(implicit val bindingModule: BindingModule) extends ScalatraServlet with Authentication
                                                   with RESTRoutes {
 ....
}
This needs to be added to all classes that want to have there resources injected by subcut. With this implicit value subcut has access to the configuration and can use it to inject dependencies. We’ve defined our routes in the RESTRoutes trait, so lets look at how we configure this trait to work with subcut:
trait RESTRoutes extends ScalatraBase with Injectable {

    // simple logger
  val logger = Logger(classOf[RESTRoutes]);

  // This repository is injected based on type. If no type can be found an exception is thrown
  val itemRepo = inject[ItemRepo]
  // This repo is injected optionally. If none is provided a standard one will be created
  val bidRepo = injectOptional[BidRepo] getOrElse {new BidRepository};

  ...
}
We added the Injectable trait from subcut so we can use the inject functions (of which there are multiple variants). In this example the itemRepo is injected using the inject function. If no suitable implementation can be found an error message is thrown. And the bidRepo is injected using injectOptional. If nothing was bound, a default is used. Since this trait is used by the servlet we just saw (the one with the implicit bindingmodule) it has access to the binding configuration and subcut will inject the required dependencies.
Bootstrap the 'root' object with our configuration
All we need to do now is tell our root object (the servlet) which configuration it should use, and everything will be wired together. We do this from the generated Scalatra listener, where we add the following:
   ...
  override def init(context: ServletContext) {

    // reference the project configuation, this is implicatly passed into the
    // helloScalatraServlet
    implicit val bindingModule = ProjectConfiguration

    // Mount one or more servlets, this will inject the projectconfiguration
    context.mount(new HelloScalatraServlet, "/*")
  }

  ...
Here we create the bindingModule, which is implicitly passed into the constructor of the HelloScalatraServlet. And that’s it, when you now start the application, subcut will determine which dependency needs to be injected. And thats it. If we now start the application subcut will handle the dependencies. If all goes well, and all dependencies are found, the application will start up successfully. If one of the dependencies can’t be found an error will be thrown like this:
15:05:51.112 [main] WARN  o.eclipse.jetty.webapp.WebAppContext - Failed startup of context o.e.j.w.WebAppContext{/,file:/Users/jos/Dev/scalatra/firststeps/hello-scalatra/src/main/webapp/},src/main/webapp
org.scala_tools.subcut.inject.BindingException: No binding for key BindingKey(org.smartjava.scalatra.repository.ItemRepo,None)
	at org.scala_tools.subcut.inject.BindingModule$class.inject(BindingModule.scala:66) ~[subcut_2.9.1-2.0-SNAPSHOT.jar:2.0-SNAPSHOT]
On to the next item on the list, Akka.
Add asynchronous processing with Akka
Akka provides you with a complete Actor framework you can use to create scalable, multi-threading applications. Scalatra has support for Akka out of the box, so getting it to work is very easy. Just add the correct trait, wrap functions with the Future function and you’re pretty much done. All the action happens in the RESTRoutes trait where we’ve defined our routes. Lets enable a couple of these methods to use Akka.
trait RESTRoutes extends ScalatraBase with Injectable with AkkaSupport{

   ...

  /**
   * Handles get based on items id. This operation doesn't have a specific
   * media-type since we're doing a simple GET without content. This operation
   * returns an item of the type application/vnd.smartbid.item+json
   */
  get("/items/:id") {
    // set the result content type
	contentType = "application/vnd.smartbid.item+json"

	// the future can't access params directly, so extract them first
	val id = params("id").toInt;

    Future {
	    // convert response to json and return as OK
	    itemRepo.get(id) match {
	      case Some(x) => Ok(write(x));
	      case None => NotFound("Item with id " + id + " not found");
	    }
    }
  }

  /**
   * Delete the specified item
   */
  delete("/items/:id") {
   val id = params("id").toInt;

    Future {
       itemRepo.delete(id) match {
        case Some(x) => NoContent();
        case None => NotFound("Item with id " + id + " not found");
      }
    }
  }
  ...
}
Not much too see here. We just added the AkkaSupport trait and wrap our method body with the Future function. This will run the code block asynchronously. Scalatra will wait until this block is done, and return the result. One thing to note here, is that you don’t have access to the request context variables provided by scalatra. So if you want to set the response content-type you need to do this outside the future. The same goes for instance for accessing parameters or the request body. All you need to do now is setup an Akka ActorSystem. The easiest way to do this, is by just using the default actor system. See the Akka documentation for the advanced options.
class HelloScalatraServlet(implicit val bindingModule: BindingModule) extends ScalatraServlet with Authentication
                                                   with AkkaSupport
                                                   with RESTRoutes {

  // create a default actor system. This is used from the futures in the web routes
  val system = ActorSystem()
}
Now when you run the servlet container you’ll be using Akka futures to handle the requests.
Add CORS and deploy on the cloud
As a final step lets add CORS. with CORS you can open up your API for use from other domains. This avoids the need for JSONP. Using this in scalatra is suprisingly simple. Just add the trait CorsSupport and you’re done. You’ll see something like this, when you start the application:
15:31:28.505 [main] DEBUG o.s.scalatra.HelloScalatraServlet - Enabled CORS Support with:
allowedOrigins:
	*
allowedMethods:
	GET, POST, PUT, DELETE, HEAD, OPTIONS, PATCH
allowedHeaders:
	Cookie, Host, X-Forwarded-For, Accept-Charset, If-Modified-Since, Accept-Language, X-Forwarded-Port, Connection, X-Forwarded-Proto, User-Agent, Referer, Accept-Encoding, X-Requested-With, Authorization, Accept, Content-Type
You can fine tune what you support by using a set of init parameters explained here.
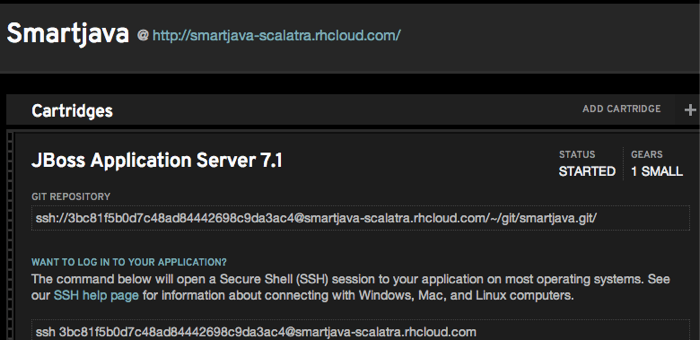
Now all that is left is to package everything up, and deploy it to openshift. If you haven’t done so already, register on openshift (it’s free). For my example I use a standard “JBoss Application Server 7.1” application, without any cartridges.
I didn’t want to configure postgresql, so I created a dummy repo implementation:
class DummyBidRepository extends BidRepo{

  val dummy = new Bid(Option(10l),10,10,20,"FL",10l,12345l, List());

  def get(bid: Long, user: String) : Option[Bid] = {
    Option(dummy);
  }
  def create(bid: Bid): Bid = {
    dummy;
  }
  def delete(user:String, bid: Long) : Option[Bid] = {
    Option(dummy);
  }
}
And used subcut to inject this one, instead of the repo that requires a database:
bind [BidRepo] toSingle new DummyBidRepository
With this small change we can use sbt to create war file.
jos@Joss-MacBook-Pro.local:~/Dev/scalatra/firststeps/hello-scalatra$ sbt package && cp target/scala-2.9.1/hello-scalatra_2.9.1-0.1.0-SNAPSHOT.war ~/dev/git/smartjava/deployments/
[info] Loading project definition from /Users/jos/Dev/scalatra/firststeps/hello-scalatra/project
[info] Set current project to hello-scalatra (in build file:/Users/jos/Dev/scalatra/firststeps/hello-scalatra/)
[info] Compiling 2 Scala sources to /Users/jos/Dev/scalatra/firststeps/hello-scalatra/target/scala-2.9.1/classes...
[info] Packaging /Users/jos/Dev/scalatra/firststeps/hello-scalatra/target/scala-2.9.1/hello-scalatra_2.9.1-0.1.0-SNAPSHOT.war ...
[info] Done packaging.
[success] Total time: 7 s, completed Oct 5, 2012 1:57:12 PM
And use git to deploy it to openshift
jos@Joss-MacBook-Pro.local:~/git/smartjava/deployments$ git add hello-scalatra_2.9.1-0.1.0-SNAPSHOT.war && git commit -m 'update' && git push
[master b1c6eae] update
 1 files changed, 0 insertions(+), 0 deletions(-)
Counting objects: 7, done.
Delta compression using up to 8 threads.
Compressing objects: 100% (4/4), done.
Writing objects: 100% (4/4), 11.16 KiB, done.
Total 4 (delta 3), reused 0 (delta 0)
remote: Stopping application...
remote: Done
remote: ~/git/smartjava.git ~/git/smartjava.git
remote: ~/git/smartjava.git
remote: Running .openshift/action_hooks/pre_build
...
remote: Emptying tmp dir: /var/lib/stickshift/3bc81f5b0d7c48ad84442698c9da3ac4/smartjava/jbossas-7/standalone/tmp/work
remote: Running .openshift/action_hooks/deploy
remote: Starting application...
remote: Done
remote: Running .openshift/action_hooks/post_deploy
To ssh://3bc81f5b0d7c48ad84442698c9da3ac4@smartjava-scalatra.rhcloud.com/~/git/smartjava.git/
   a45121a..b1c6eae  master -> master
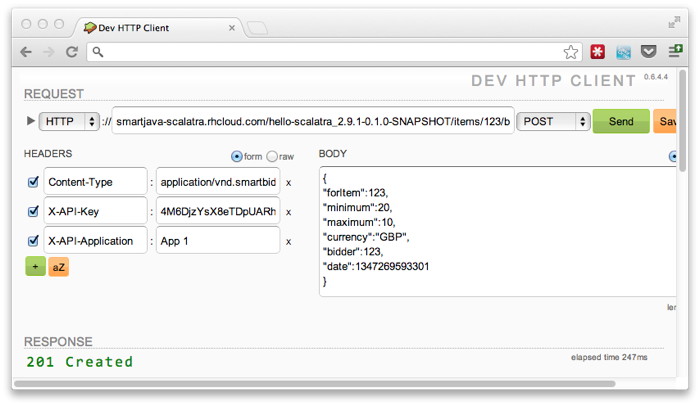
You’ll probably see something similar, and now you’re done. Or at least, almost done. Cause what happens when you access a resource:
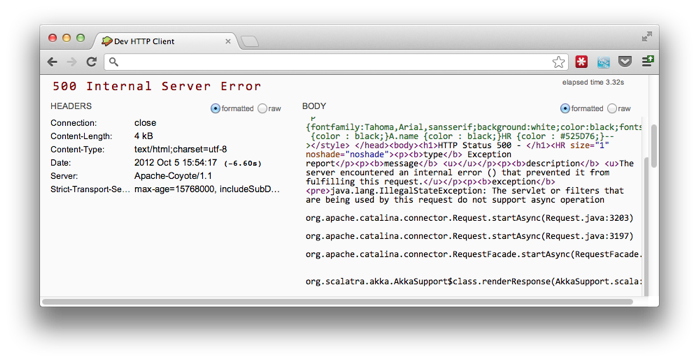
Hmm.. something went wrong. This is the message that’s interesting to us:
java.lang.IllegalStateException: The servlet or filters that are being used by this request do not support async operation
Hmmm.. apparently JBoss AS handles servlets a bit different from Jetty. The reason we see this message is that by default, according to the servlet 3.0 spec, servlets aren’t enabled to support async operations. Since we use Akka Futures as a result for our routes, we need this async support. Normally you enable this support in a web.xml or using annotations on a servlet. In our case, however, our servlet is started from a listener:
  override def init(context: ServletContext) {

    // reference the project configuation, this is implicatly passed into the
    // helloScalatraServlet
    implicit val bindingModule = ProjectConfiguration

    // Mount one or more servlets, this will inject the projectconfiguration
    context.mount(new HelloScalatraServlet, "/*")
  }
Context.mount is a convenience method provided by scalatra that registers the servlet. However, this doesn’t enable async support. If we register the servlet ourself we can enable this async support. So replace the previous function with this function:
  override def init(context: ServletContext) {

    // reference the project configuation, this is implicatly passed into the
    // helloScalatraServlet
    implicit val bindingModule = ProjectConfiguration

    val servlet = new HelloScalatraServlet

    val reg = context.addServlet(servlet.getClass.getName,servlet);
    reg.addMapping("/*");
    reg.setAsyncSupported(true);
  }
Now we explicitly enable async support. Create a package again, and use git to deploy the web app to openshift
sbt package
git add hello-scalatra_2.9.1-0.1.0-SNAPSHOT.war && git commit -m 'update' && git push
And now you’ve got a working version of your API running on openshift!